Black and White Editing with Janine Krayer
In the video below you will watch Pangolin Photo Host Janine Krayer explain how she select pictures for Black and White editing, or which pictures lend themselves best.
Enjoy and we hope to see you on safari soon!
Black and White editing video transcript below
Hi guys! This is Janine from Pangolin Photo Safaris, and today I briefly want to touch on, how to choose pictures for black and white editing, OR…which pictures lend themselves best.
Before we get started, I first want to highlight that editing in black and white is a huge field….whether you shoot in black and white, or convert your images in post-production. How you like it is all up to your own imagination, and your own taste. So, it’s a vast field that needs to be covered.
Today, I briefly want to touch on which pictures lend themselves best for being turned into a black and white image.
All right, when we talk about a black and white editing, the first thing that jumps to mind is…high contrast images.
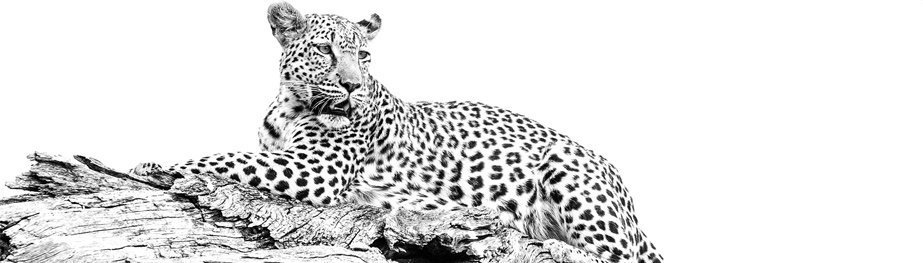
That’s why I love turning leopards into black and white – with those black dots on the white (light) fur – and the black eyeliner in the lighter fur…it’s perfect! They just simply pop in black and white. But also images where you have a different contrast in your background, than what you have to your subjects, are great for black and white. This lioness was beautifully illuminated by the sun, with some dark deep shadows in the background…and I feel it looks absolutely gorgeous. Look how she stands out in front of that almost black background. Apart from that, patterns work really well for black and white images, for example wrinkles, tree trunks, skin patterns that are very deep and cast shadows over the skin. It looks absolutely awesome in black and white….and while we’re talking about contrast, any other type of colour variations or light variations on the skin, work perfectly well. So, here we have it both…we have the pattern and the wrinkles on the skin and the black and white just really enhances it. PLUS we have that beautiful white soil that he rubbed himself in, that makes him look like a clown. So, as we continue…you will see that my white balance in this image is totally off, and if I were to edit it in colour, I would try and make it a little bit cooler, even though I do love the golden hour. But looking at that image with that tone and wall against elephant, I find it almost a little bit boring. What’s striking is that white make-up all the way down his trunk…and that just screams black and white!
So let’s give it a quick try. If I turn this into black and white you’ll see it has a very grey filter all over it. I find personally that a black and white image really needs to be black and white, so as you edit, you can really pull your blacks and whites apart. It needs to get some contrast…as we said earlier. So, pull the blacks hard. You can always finely adjust it by pulling the shadows back a bit again. I want to bring the highlights down here, so that that white comes back out…and I need to bring that overall exposure down a little bit. He is extremely bright. And then you can choose. A black and white image works really well with clarity. The clarity just enhances the added contrast a little bit more, and here you can choose to just pull the clarity in your overall image, or be a bit more selective with your adjustment brush, and adjust the clarity and maybe even the sharpness in your subject…and you will see how beautifully the wrinkles on his trunk come back out. I am doing this very rough right now to save you guys time, but you get the point. He really starts popping out of the image. But not just high contrast situations, per se…also difficult light situations really lend themselves to black and white editing afterwards. If you shoot into the sun, and you struggle getting detail, and the colours are washed out because it’s the middle of the day…then black and white can really work so well. Here you need to be careful that you really make your blacks absolutely black, and your shadows black. What you don’t want is that little bit of detail, or maybe that little bit of colour, within your subject. That looks quite funny, so make sure it is a proper black and white image. Same here. You always need the profile for a nice silhouette. So, if I go back…you will see the initial image here already has perfectly black elephants, so if you shoot straight into the sun, this is what you get. Your shadow is really, really deep and you’ll be surprised. A silhouette such as that, you’re going to have to early expose by more than two, in order for you to get a nice bright sky. There is nothing worse than having a nice black silhouette, but then a sort of egg shell even grey toned sky. You want that sky to be really bright – to pop! You will see this even works halfway in colour, we turn that into black and white…boom! and it is done. Super easy to edit.
You will have noticed that all these subjects were fairly far away. Sometimes you might be a bit closer, and you still have the same problem. This image was shot at 12:30 (during the day) in really, really harsh light conditions. The sun was glaring off that little pond. I was sitting in a hide before lunch…and I could really not see much of that baby elephant, but it was so cute next to its mom. So, what I decided to do – in this instance – I over-exposed even more than for a silhouette. I over-exposed by +4, and you will see the initial raw file looks absolutely horrid. Washed out. There is no real colour. So what I did is I turned it into black and white, and make my whites even whiter, and I made my blacks super black. As I said, you can finely adjust it with your shadows. The same applies to this hippo. It was shot straight into the sun. You can see that the shadow is all over his face.You only have a little bit of sunlight on his back here. So, the only thing I could do was over-expose dramatically.
So much so, that I lost some of the water here…and turn it into a high key image. Please do remember though, not to crop high key images too tight. These things need space to breathe. If you do have a white background, make use of it. Give it space. It’s only when your backgrounds are super busy, that you try and avoid them. Otherwise, giving animals a bit of space is nice. But it is not just the really bad light situations, that you can turn into black and white. Sometimes, it’s just a really dull picture. So, this was (I would say) is a fairly mediocre picture, when I started off. I would have liked to shoot at lower, but didn’t have the option to…and, I wasn’t quite happy with the light. However, just by turning it into black and white, it feels way more dramatic. I do have the contrast in the dog, so that also helps to elevate him. But little imperfections in photographs can be covered up so beautifully in black and white images.
This image was shot way before sunrise, on a extremely low shutter, and I just didn’t get a perfectly sharp. You see there is some motion blur in the whiskers. There is some motion blur on the paw, and there is also quite a bit of noise happening here. So, between the beautiful pattern of the tree trunk, and the beautiful contrast in the leopard, and the darker background, I found it looked so much more interesting – in black and white – than what it did initially in colour. So, black and white can cover-up little flaws really beautifully.
Talking about in low-light conditions, let’s have a look. This image was shot on but I loved that scorched-earth with that lighter coloured lion walking across. So, if I zoom in, you’ll see noise is quite an issue. I have a very good camera, but on 20,000 ISO, even my camera does start to struggle. Black and white works extremely well with the noise…and the reason for that, is that it has this antique – almost old fashioned look – to it. It has a bit more grit, because there’s not all these colours, that extra bit of pattern noise, doesn’t disrupt so much. So again, if I just turn it into black and white, and everything is on 0, it all looks pretty unspectacular. If I turn a little bit more contrast here, you will see that beautiful contrast in the background with the diagonal lines…and suddenly, that noise, I don’t find it so distracting anymore. There’s actually quite a beautiful picture – despite all that noise. The same with this little image here…shot a 6,400 ISO – not quite as high,but if I zoom in a lot, you will see there are certain imperfections.There is a lot of noise, but then there’s also a bit of motion.I only shot it on a 1/100 sec…that’s almost not enough for water splashing.
On top of that, if I show you the original image, it doesn’t really have very interesting colour. All sort of one tone..a bit of a beige brown. Yes, there was evening light, but there’s half shadow on that baby elephant, so I wasn’t entirely happy with it. Turning it into black and white – in pulling the clarity a bit in that baby elephant – elevates the contrast that we need. Elevates those little patterns and the water splashes, and suddenly it’s a really gorgeous picture. But don’t think clarity, and black and white, saves everything. Black and white pictures have that stigma of being bad images. If you don’t have a good image, you turn it into black and white, and it saves everything. That’s not necessarily the case. This lion was shot very, very early in the morning, also on extremely high ISO of 32,000. There is a lot of noise, even though it is sharp. If I turn this into black and white, and try and get that contrast out, and pull the clarity, it makes your background also look incredibly busy. And even if I just pull the clarity in my lion, I don’t find this background extremely attractive. The black and white can do nothing to conceal that. It takes away from that gorgeous lion. However don’t turn every single image – that is shot on a high ISO – into a black and white image.
If you shoot a subject up close, noise is not always as disruptive. If you have a nice colour, keep it that way. There is a difference between having no light, as in flat light, and you just don’t get any colours out of it. Flat because it’s extremely overcast, or flat because it’s the middle of the day, and having low light…low gorgeous glowing light. So, these images were shot in low light, on a very high ISO…but I love the orange glow the eyes, complementing the green – very stark contrast. The same with this image. It lives off its glow…yes, of course you could turn this into black and white. It could work. There is enough contrast around the eyes. Around the body. But really, it is so much more interesting with that beautiful glow after sunset. That purple hour of colours. So, if you do have nice evening colours, or nice colours in your subject – despite all the noise in the world – do not just turn it into black and white. A Blue Kingfisher lives of the blue in its feathers. So, I hope this gave you a little bit of an idea on how to choose images to convert them into black-and white. How to play with your images?…and what makes a really nice black and white picture.
If you are interested to learn more about black and white editing? The difference between monochrome and black-and-white? The difference between shooting in black-and-white and converting into black-and-white afterwards? There are more videos coming out in the future, so please stay tuned.
Until then, play around with your images.
I really hope you enjoyed this blog.
