Safari Photo Tips – Depth of Field
Table of Contents
- What is depth of field?
- Factors affecting depth of field
- Best aperture settings for wildlife photography (video)
- How do I calculate depth of field?
- Depth of field: the terminology
- Understanding shallow depth of field
- Understanding a large or deep depth of field
- What about hyperfocal distance
- Depth of field basics
- Focal length and wide angle lens
- Camera aperture and aperture priority mode
- Shutter speed and depth of field
- Getting the most out of depth of field creatively (video)
- Going on safari
Everything you need to know about depth of field, focal length, hyperfocal distance, deeper depth and more!
Before getting started, we know that depth of field, getting the right focal length, lens depth (i.e maximum depth vs extreme depth) can all be a little overwhelming but let us tell you that we believe that depth of field is one of the most important creative tools for photographers to master. So keep reading to learn more about nailing your focusing distance and more.

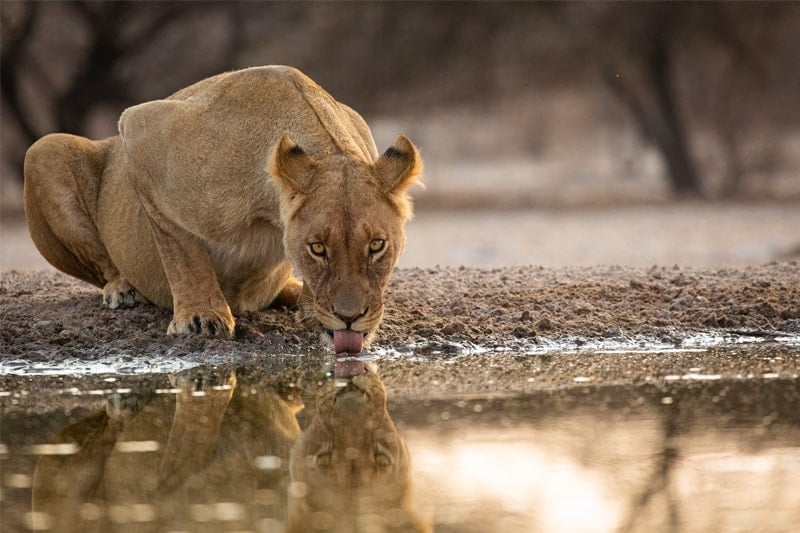
© Sabine Stols
Depth of field is a fundamental concept to grasp when it comes to photography. Fully understanding depth of field and focus distance as a concept and what factors affect it will without a doubt help you take your photography to the next level.
Simply put, depth of field is the distance between the closest and farthest objects in a photo that appears acceptably sharp. All that’s meant by ‘acceptably sharp’ is the sharpness of the space between your point of focus and the space in front of and behind that focus point.
These areas of focus correspond with depth of field. Naturally, the sharp zone will vary from image to image depending on the different factors that contribute to acceptably sharp images.
By adjusting your camera settings and your subject distance, you can determine the amount of your image that turns out with acceptable sharpness and the amount of out-of-focus areas. Another key component in this would be hyperfocal distance which we will cover a little later.

© Charl Stols
There are multiple ways to adjust depth of field, including aperture, the camera subject distance, lens focal length and camera’s sensor. So although, depth of field is often believed to only be controlled by adjusting the aperture setting solely, there are a few other combinations that can help you nail down your depth of field. Let’s take a look at the main elements when it comes to understanding depth of field:
- The ƒ-number at which the photo is taken.
- The given focal length of the lens used to create the image.
- The distance the main subject is from the camera.
- The distance between the subject and the background.

© Charl Stols
Best Aperture Settings For Wildlife Photography
Depth of field can also get really complicated, with apps calculating depth down to the inch – but if we’re being honest – that takes out a lot of the enjoyment of wildlife photography so let’s just focus on figuring out when you need a small depth of field and how to create it. The same for a larger depth of field.

© Sabine Stols
We have already established that mastering depth of field is essential for having all the important elements that you want in your image in focus, but before going on a deep dive with the technical terms, let’s get familiar with the most common depth of field terminology.
Just a note! We’re going to talk a lot about aperture so just to brush up on that: your camera’s aperture controls the blurriness and sharpness by adjusting the size of the opening in the lens.

© Sabine Stols
A shallow depth of field is what we refer to as an image with a short focal point. Ultimately, there is a small part of your image sharp (in focus). Shallow depth of field is used interchangeably with small depth of field but sometimes it is also called narrow depth of field.
A shallow depth of field is the small or narrow area in a picture that is in focus. This technique would result in an image with a blurred background and in focus subject. To achieve this shallow depth of field you would want to increase your aperture (lowering your f-number). Many professional portrait photographers would use this shallow depth of field technique.
By decreasing your depth of field and increasing your lens aperture you can create this blur with a much shallower depth.
This effect can also be achieved by changing the focus distance of the camera subject distance. Do this while also adjusting the focal length. If the subject is closer to the camera, you will have a much more shallow depth or narrower focus point. The shallower your depth (achieved with a longer lens focal length) can also create a very shallow depth background blur.
To decrease your depth of field, you should focus on a wide aperture (a lower f-number), closer camera distance to your subject or longer focal length. To get a longer focal length you can use a longer focal length lens.

© Charl Stols
On the other hand, a large depth of field is a greater depth of field. This simply means that there is more of the image in focus. The subject distance here would be longer. This is also known as deep depth of field or deeper depth.
You would use a deep depth if you want to keep more of your image sharp and clear. This is most commonly used for landscape photography. To capture this you would want to use a narrow aperture setting.
To get the desired depth of field you would want to have your aperture set to f/16 or smaller. As for the given focus distance, you want your camera subject distance to be as far away as possible and use a lens with short focal lengths.
So just remember, to create a deep depth of field you want to have a narrow aperture setting, further subject distance and short focal lengths. This should help you with beautiful landscape photography!

© Danielle Carstens
Let’s start out by saying that the topic of hyperfocal distance can be confusing for even professionals! As we now know, depth of field extends in front of the point of focus and behind it. Meaning that if your focal length is at infinity or on the horizon you’ll actually lose sharpness as well lose out on an effective focal length and waste some depth of field.
That’s where your hyperfocal distance comes into play. Hyperfocal distance focusing is a technique that enables you to capture the maximum deep depth of field possible in a photograph. The aim is to have your focus distance so that the far limit of focal plane just reaches infinity. The point on which you need to focus to achieve this is known as the hyperfocal distance.
Simply put, the hyperfocal distance is the near limit of depth of field when your focusing distance is on infinity. And when you focus on the hyperfocal distance, the depth of field extends from roughly half the hyperfocal distance to infinity.
There are depth of field tables widely available on the internet as well as from camera manufacturers that tell you where the hyperfocal distance is for any given lens and camera combination, even compact digital cameras. However, hyperfocal distance is not a fixed value for a lens – even with telephoto lenses it changes with the aperture and the focal length. This is where a hyperfocal distance calculator would come in handy! We recommend Canon’s free Photo Companion app to help with your hyperfocal distance and depth of field calculations. That being said, if you don’t have time for calculations, and hyperfocal distance eludes you – a rough rule of thumb is to focus approximately one-third of the way into a scene. Let us know if you have any tips and tricks for hyperfocal distance too.

© Danielle Carstens
As we mentioned earlier, once you’ve got the basics and understand that aperture, focal length, and distance to the subject all work in tandem you will quickly start capturing dynamic and professional-looking photographs. Whether you’re into portrait photography or wildlife photography – the basics remain the same. There was quite a lot to cover in the above so let’s do a quick recap before moving on.
Increasing depth of field for sharpness:
- Small aperture (make it smaller by increasing f-number)
- Move away from the subject by increasing the viewing distance
- Use a lens with a shorter focal length
Decreasing depth of field for blur:
- Widen the aperture (make it bigger by decreasing the f-number)
- Move closer to the subject (i.e. closer focusing distances)
- Use a lens with a longer focal length

It would be fair to assume that most photographers choose the focal length of the lens to suit the subject or the shooting conditions rather than for the depth of field. That being said, there is an accepted rule that you would get greater depth of field with a wide-angle lens than with telephoto lenses. But that’s not actually true! A wide angle lens will magnify the subject less than a telephoto lens – meaning that more of the image will appear sharper. But, depth of field is all about acceptable sharpness, so it is true that a wide-angle image will give the appearance or illusion of greater sharpness as a whole.
Another thing to keep in mind is composition, focus distance and subject distance – with the wide angle lens you would not have the same camera subject distance, you would need to move much closer to the subject unlike with a full-frame camera and telephoto lens meaning that the depth of field is very similar or that each image has the same depth at the same aperture setting. That being said, a wide-angle lens is good for landscapes where you would want sharpness from front to back but medium telephoto lenses would be good for portraits or even macro photography where you want an out-of-focus background.
As a very general rule, wide-angle lenses are good for landscapes where you want sharpness from front to back. Medium telephoto lenses (around 100mm or 135mm) are good for portraits if you want an out-of-focus background.

© Sabine Stols
The best advice for controlling depth of field while keeping things relatively simple is to shoot in Aperture priority (Av) mode.

© Charl Stols
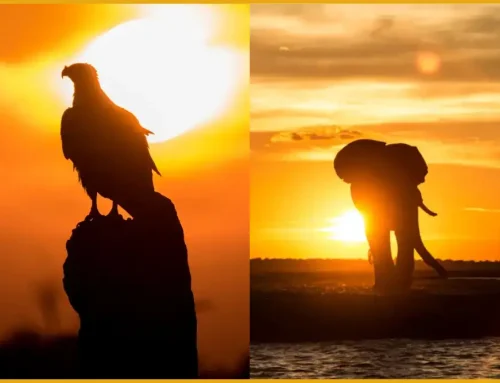
Now that you’re comfortable with the concept of depth of field, you can also play around with your shutter speed. Take Sabine’s fish eagle example below, her settings for this image are shutter speed = 1/40 with an f-number of 18 and ISO 400. This may seem a little complicated but once you’ve played around a bit with your shutter speed, focal length and ISO you’ll soon find out how depth and various settings mentioned in this article can work together for an amazing image.

© Sabine Stols
You’ve read the theory, now it’s time to test it out – check out Danielle’s youtube video about depth of field and how to use it creatively!

We’d love to see you implementing these tips on depth of field on the Chobe River where we can help you line up your viewing distance perfectly to get the point image of your trip! Our photo hosts are also geared up to tell you about light rays, providing lens depth information and talk you through what different camera manufacturers assume when it comes to how lenses affects depth. Contact our safari planners today.