Nikon Autofocus modes and settings
Nikon Autofocus modes and settings

Quick links
Single Servo Autofocus • Continuous Focus Mode • AF Mode • Single Point • Dynamic Area Mode • Group Area
• Other AF Modes • Focus Priority • Focus Tracking • Autofocus Area Modes
Setting up focus modes for wildlife photography
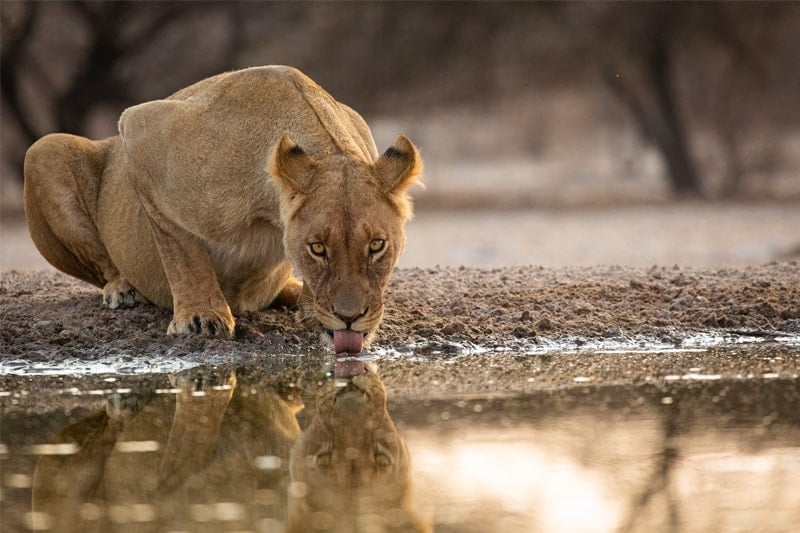
Pangolin Photo Host Danielle Carstens talks to us about the various options Nikon offers for autofocus modes and settings for wildlife photography. Danielle also gives helpful tips for setting up your focus points in the menu system to ensure you get the most out of your camera. Getting pin-sharp focus on your images is essential for wildlife photography. Of course, every camera is slightly different, so we recommend grabbing your camera and following on by watching the video or following the steps from this blog.

In this mode, your camera focuses once and does not continue to focus after the initial focus is achieved. That means that when you press your assigned focus button, whether you are pressing your shutter release button halfway or your back button, once you’ve pressed that button and focus has been achieved, that’s it – the focus is locked at that distance. You can set up a beep to tell you when focus has been achieved and confirmed, and then you know that’s it at that distance. If the distance between you and your subject then changes after focus has been achieved. Unfortunately, the focus will be lost, and the only way to refocus is to take your finger off of that button and repress it to refocus.
Therefore AF-S is made for stationary subjects only, and it doesn’t work when you’re trying to track moving subjects, so AF-S is for stationary subjects only.
Once you have acquired focus on your subject by pressing your focusing button down, and as long as you keep your focus point on the subject, the camera will continuously adjust focus. Whether it comes closer or moves further away from you or whether you move towards the subject or not, the camera will continuously focus. As long as you keep that focus point on the subject and your focusing button down, it’ll keep your subject sharp until you actually take the shot.
This mode is made for tracking moving subjects just remember that there’s no beep that you can set up because the focus is continuously changing.
Otherwise known as auto autofocus, you’ll find this in some camera models and what this function does is that the camera chooses the autofocus mode that it wants to be in. It’ll switch between AF-C and AF-S, depending on the subject.

For example, if a stationary subject starts moving, it’ll switch from AF-S to AF-C and vice versa. Danielle notes that, personally, she does not use this method for wildlife photography. Her choice of autofocus would be AF-C as the most accurate function. In AF-C, you can photograph both stationary and moving subjects, which is an essential asset in wildlife photography – especially when you’re tracking birds, for example – one minute, they are sitting on a branch, and the next minute they are flying off. So you need to be able to shift quickly between the two.
Full-time servo AF (AF-F)
AF-F is specially made for videos as it tracks moving subjects in live view, and it’s only available when you’re in video mode. Similarly to AF-A, Danielle prefers not to use this mode for wildlife photography as it is not as stable when shooting fast-moving or erratic subjects. However, it’s important to note what this function is if it is available in your camera settings.
Changing between autofocus modes
If you look at your camera, you’ll see a switch on the side of the camera. It has a button in the middle, and it has a switch between autofocus and manual focus. You would press the button in, and you move your command dials however you’ve set it up, and it switches between different autofocus modes.
In newer models, especially on the mirrorless range, there’s no such button on the left, and you have to set up one of your function buttons as a shortcut to toggle between the different autofocus modes.

Single-point AF
This means that there’s only one focus point to use, and you can move this focus point around to be on the part of the subject that you want the sharpest. In low light, it’s best to use the center focus point.
When should you use single-point AF? When shooting through something, needing very precise focusing, when there are other distracting objects in the photograph and when panning to get the head of the subject as sharp as possible.
Dynamic-area AF
This is where you’ll see 9 / 21 / 51 / 153 points (it differs from camera model to camera model). What this does is you pick your initial focusing point, then if your subject accidentally leaves that point and you don’t manage to keep that one point on your subject, the camera will then activate the surrounding points and use them to acquire focus.
However, if your subject then leaves that cluster of 9 or 51, then focus will, unfortunately, be lost. This is often used for erratic or fast-moving subjects when you struggle to keep a single focus point on the subject. It is really important to note, though, that your background has to be clean because if your background is not clean, the camera might pick one of the points that fall on movement in the background or a subject in the background.
Preferably use this mode only when you’re shooting with a clean background. The other thing to note is if you’re shooting a bird, for example, the camera might pick the wing tip as the focus, and then the face of the bird or the eye might not be sharp.
To solve this, you can increase your f-number (aperture), or you can choose to shoot with fewer points. Play around; if you find this happens with 153 points, for example, maybe come down to 21 or 9 points for example.

3d tracking
This is similar to the other modes we’ve mentioned, but the main difference is that it uses all the focus points of the camera. You would set this up by selecting one point where it focuses, and then as the subject moves, the same focus will follow the subject. Again, having a clean background and no other stark moving subjects in the frame is imperative. 3d tracking is for you if you want to save time and you have a clean background with nothing else moving.
Group-area AF
In this mode, the camera uses five focus points. You’ll see four on your screen, but the fifth is at the center. GA-AF uses these points simultaneously, which is what makes it different from the other autofocus area modes.
This mode does not give preference to any of the points. However, it does give preference to the subject that is closer. So if you always want the subject that is closer to be in focus then it works really well.
GA-AF works really well when your subject is separated from the background, and there’s no nothing interfering with the frame. It works especially well if the subject is also fairly far away from the background. Just keep in mind that when you’re using this mode, the different points fall on different areas of your subject. An example is that if you’re photographing a crocodile and one of the points falls on its nose, then the eyes will not be focused if you’re using a shallow depth of field. Or if you’re photographing a bird and it’s facing you, and one of the points fall on the beak, then, whatever’s behind the beak will not be as sharp.
You can compensate for that by increasing your f-number but just be aware of the fact that the group always selects the part or the subject that is closest to the camera. It’s great to use in low contrast or low light and when it’s difficult to track a subject.
Pinpoint autofocus
This is for ultra-specific focusing and is only available in AF-S and in live view. If you have time and if you need pinpoint focus on a very small part that you need to focus on. Say you’re shooting in between a lot of grass, then you can switch to AF-S, and you can use pinpoint focus.
Wide-area AF (S) / Wide-area AF (L)
Nikon compares this to group area AF, where it uses a large focus point made up of smaller focusing points acting as a cluster.

How to change between AF area modes
It’s the same button on the side of the camera that you hold in, and then you just turn your front command dial to rotate between the different AF area modes.

Focus priority
You can tell your camera to take the shot only once focus has been achieved, or you can tell it to take the shot whether the focus has been achieved or not. Danielle doesn’t like to shoot on AF-S often, but she likes to leave it on focus priority because you’ll mostly be shooting stationary subjects.
AF-C is, however, set up in a few different ways depending on the camera model.
Release: The photo is taken regardless of being in focus or not and has the highest frame advance rate possible.
Focus: The photo is taken only once the focus has been confirmed. This might slow down the frame advance rate.
In some camera models, you will see a release and focus option. This means the camera gives priority to focus in continuous release mode. The frame rate may drop depending on the subject. You might also see a focus and release option, so in continuous release mode, the camera gives priority to focus for the first frame in a sequence and then to frame rate for the remaining frames.
That’s great and all, but why would you want the camera to take a shot if it hasn’t focused?
Well, sometimes the camera has good focus, but it hasn’t confirmed it yet, and then you miss the shot. For example, if you’re shooting at a higher f-number and you’re working with a wider depth of field, then there are maybe two areas in your shot that are so close together that the difference in focus is hardly noticeable, but the camera doesn’t take the shot because it believes it isn’t focused and then you miss the shot unfortunately.
Danielle notes that for this reason, together with the fact that she gets the maximum frame rate when she shoots in release.
This looks quite different across Nikon cameras, but when you see the one to five blocked
shot AF response, it means that you’re telling the camera how long to pause after it has lost focus on a subject before it attempts to refocus. In essence, you’re telling it how sticky or not sticky it should be. On a scale of one to five, five being very sticky and one not so sticky.
For example, if something crosses between you and your subject and you don’t want the focus to switch to whatever’s crossing in between, then you make it very sticky. Just keep in mind that if you do make it very sticky (towards five), it means that if you then also accidentally lose focus (so you drop your focus point off of your subject), then it will take a little bit longer to reacquire that focus on your subject.
Subject motion
This is split into two categories; steady and erratic. If it’s steady, then it’s for subjects that are moving predictably (a lazy lion walking towards you at a slow pace), or if it’s erratic, it’s looking at things harder to focus on (swallows flying around). This is a handy option if you know exactly what you’re setting out to shoot.

As you can tell, there are a lot of autofocus area modes available, and you might waste time and miss a shot if you keep scrolling through all the available options looking for the one you want. Therefore you can just choose which ones are available while scrolling through, and you do this in your menu.
Danielle’s preferred menu setup:
– Sing Point
– Group
– Dynamic nine
And that is how the Nikon autofocus system works! If you’re struggling with your autofocus, check out Danielle’s previous blog on common camera autofocus issues.
Join us on a Photo Safari!


Leave A Comment